|
Advanced Simulated Radar Client Copyright 2002
|
Usage
This section describes the usage of ASRC. This section presumes that you have already familiarized yourself with the configuration of ASRC.
Connecting to the network
To connect to the network:
1. On the FILE menu, click CONNECT
2. A dialog box will appear
3. Fill in all blanks.
4. Enter a single letter ‘TAG’ that you wish to use to represent aircraft owned by yourself in ARTS mode.
5. If ‘TAG’ is left blank, ‘TAG’ will be decided by the POF, or assigned by ASRC if no POF exists.
6. Click OK
If you place a file named ipaddr.txt in the ASRC directory, the server box will be populated with entries from that file.
Disconnecting from the network
To disconnect from the network:
· On the FILE menu, click DISCONNECT
VSCS (Voice Switching & Control System)
A word of warning: VSCS
communication is NOT private. Moreover, unlike
regular voice communication in legacy programs, there may be situations
(override, monitor) where your microphone WILL BE HOT when you are not
transmitting to pilots. While pilots can
only hear your transmissions when you are actually transmitting on the
frequency, other controllers may be monitoring your microphone at any
time. For this reason, consider the
implications of background chatter, personal communication, and personal
activities when using ASRC’s voice features.
Press <TAB> to open or close the VSCS.
Air-to-ground communications
After you have set up your frequency buttons in the VSCS (see configuration), select which frequency you will use as your primary frequency by clicking on PRIM FREQ, and then clicking on the button representing your frequency of choice. On the “primary frequency”, you will always transmit AND receive. In SB 2.3b4 (and earlier), this is the only frequency displayed to the pilots in the controller list. If you wish to use the voice channel, click the middle button and verify that it has turned green. If all three buttons representing the frequency are green, you will be ready to transmit, and receive on both voice and on text.
If you are going to be on the frequency with another controller, and may need to override the other controller (eg. no transgression zone, or instructing a student), you may wish to set up the “preempt” function. To do so:
1. click “FUNC ALT”
2. click “PRMPT”
3. click on the frequency that you wish to “preempt”
When you are in preempt mode, if you are transmitting and another ASRC client tries to transmit ton the same frequency, they will not be able to transmit.
When the VSCS is closed, the active frequencies are displayed along the bottom of the radar screen. These frequencies displayed above the input line will change color depending upon state. The colors will be as follows:
1. Green = transmit and receive mode
2. Yellow = receive mode only
3. Red = transmit mode only
4. Green box around frequency = connected to voice frequency on this channel
5. Amber box around frequency = currently transmitting (pressing push to talk)
6. Red box around frequency = disconnected from voice frequency on this channel
Ground-to-ground communications
As previously mentioned, ASRC sports exciting new features enabling controllers to coordinate traffic using voice, without leaving their voice frequency. This is achieved through the VSCS. The appropriate buttons must have been setup in the ground-to-ground section of the VSCS (see configuration).
To “OVERRIDE” another controller’s position to do a pointout or coordinate traffic:
1. Press <TAB> to open the VSCS.
2. If the first button on the lower left does not say G/G 1 at the top, click the first button, and then click G/G 1
3. Click on the OVR button that you have setup for the position that you wish to override.
4. Click on that position.
5. You will hear all of his radio traffic, and anything going through his microphone, WHETHER OR NOT HE IS PRESSING PUSH TO TALK.
6. Hold down the right CTRL key, and speak.
7. When you are done, press RLS to release the override.
Alternatively, to override another position, whether or not you have a button set up for that position, you may type:
.ov CC <enter> (where CC is the two-digit identifier of the controller to be overrided)
To cancel or stop overriding another position, you may type:
.rls <enter>
To “MONITOR” another controller’s position for educational purposes:
1. Press <TAB> to open the VSCS.
2. If the first button on the lower left does not say G/G 1 at the top, click the first button, and then click G/G 1
3. Click on the MON button that you have setup for the position that you wish to monitor.
4. Click on that position.
5. You will hear all of his radio traffic, and anything going through his microphone during radio transmissions, intercom calls, and WHETHER OR NOT HE IS PRESSING PUSH TO TALK during overrides.
6. When you are done, press RLS to release the monitor.
To place an “INTERCOM” call:
1. Press <TAB> to open the VSCS.
2. If the first button on the lower left does not say G/G 1 at the top, click the first button, and then click G/G 1
3. Click on the button that you have setup for the position that you wish to call (shows his identifier).
4. Click on that position.
5. The button will begin to flash green.
6. The button will turn steady green when the call is in progress.
7. When you are done, press RLS to release the call.
Alternatively, to commence an intercom call with another position, whether or not you have a button set up for that position, you may type:
.ic CC <enter> (where CC is the two-digit identifier of the controller to be overrided)
To cancel or disconnect the intercom call with another position, you may type:
.rls <enter>
When you receive a call, a sound will chime (if setup, see configuration).
To ANSWER a call:
1. Press <TAB> to open the VSCS.
2. If the first button on the lower left does not say G/G 1 at the top, click the first button, and then click G/G 1
3. Click on the orange flashing button
4. It will turn green once you are connected.
5. When you are done, press RLS to release the call.
The controllers in the CL will change color based upon certain events and conditions.
The following CONDITIONS will be displayed in the CL if a controller is:
|
CONDITION |
DISPLAY |
|
|
|
|
Using ASRC |
Yellow |
|
Overriding you |
Red |
|
Intercom calling you (ringing) |
|
|
Intercom call in progress (active) |
Green |
|
Monitoring you |
Turquoise |
|
Requesting position relief |
Pink |
|
Text messaging you |
Flashing Gray background |
|
Selected for text messaging |
White border |
Text radio transmissions
In normal mode, when regular text is typed on the keyboard, and the <enter> key is pressed, the text is sent out blindly onto any active radio frequencies. If an aircraft is “radioselected” (see below), text typed on the keyboard is sent out onto any active radio frequencies, and the target aircraft will hear a special sound.
To scroll backward through the radio communications history, press:
<PGUP>
To scroll forward through the radio communications history, press:
<PGDN>
When in scrollback mode, a red box will appear around the radio communications area.
To return to normal radio communications mode, press:
<END>
To copy the ASRC input line to the windows clipboard, type:
<CTRL-C>
To paste items from the windows clipboard to the ASRC input line, type:
<CTRL-V>
To save the entire radio communications history to a text file, make sure that the radio communications area is active, and type:
.log FILE <enter> (where FILE is a filename)
The history will be saved to the filename, and placed in the path indicated in the “logpath=” entry in the asrc.ini file. By default, this will be the ASRC directory. If you wish to change this, you may edit the “logpath=” entry in the asrc.ini file.
To copy the entire radio communications history to the windows clipboard, make sure that the radio communications area is active, and type:
.copy <enter>
The CL (controller list)
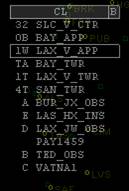
The controller list resides, by
default, in the upper right corner of the display. Click on the CL bar itself to toggle it open
and closed. Click on the small letter on
the right edge of the controller list to toggle the display filter.
The letter on the right end of the title bar indicates the display filter
status:
· “B” shows both active controllers and observers
· “A” shows only active controllers
· “O” shows only observers
· “P” shows only positions that are in your POF file
· “C” shows only those individuals who have sent you a message, or whose chat box you have opened at least once during this session
Each active controller will have a two character identifier to the left of his callsign. This two-character identifier is used for handoffs, pointouts, and for controller-to-controller communications.
The POF (Position File) is used to establish static two-character identifiers that may be used to always represent the same position for consistency (see configuration).
The controllers in the CL will change color based upon certain events and conditions.
The following CONDITIONS will be displayed in the CL if a controller is:
|
CONDITION |
DISPLAY |
|
|
|
|
Using ASRC |
Yellow |
|
Overriding you |
Red |
|
Intercom calling you (ringing) |
|
|
Intercom call in progress (active) |
Green |
|
Monitoring you |
Turquoise |
|
Requesting position relief |
Pink |
|
Text messaging you |
Flashing Gray background |
|
Selected for text messaging |
White border |
Whenever you have unanswered chats, the letters “CL” will be flashing yellow.
Text ground-to-ground communications
When you receive an incoming message via text, the background behind the calling controller will flash gray. To view the message, click on the controller’s callsign, or type the two-character callsign, and then press the CONTROLLER select key (hereafter called the <csel> key, see configuration).
A ground-to-ground text box will appear above the air-to-ground communications area. When it has the focus, this area will be gray.
To toggle the focus from ground-to-ground to air-to-ground, press:
<enter> (without any other text on the input line)
To toggle on or off the ground-to-ground communications area, press:
<csel>
To open a communications box with anyone in the controller list, type:
DD<csel> (where DD is the ID to the left of the callsign in the controller list)
The currently-selected individual in the controller list will have a white rectangular box around his callsign. Pressing <csel> without any two-character identifier will open the last selected controller.
To open a communications box with someone not in the controller list, type:
.chat CALL <enter> (where CALL is the full callsign)
To open a group chat with more than one callsign, type:
.group groupname [CALL or DD] [CALL or DD] <enter> (where CALL is the full callsign, or DD is the controller ID)
To add individuals to a group chat, type:
.a [CALL or DD] <enter>
To remove individuals from a group chat, type:
.r [CALL or DD] <enter>
To scroll back in the communications box, press:
<PGUP>
When in scroll back mode, will display a red outline to the communications box.
To scroll forward in the communications box, press:
<PGDN>
To return to normal communications mode, press:
<END>
To close a chatbox, and delete all contents, type:
.x <enter>
To send an ATC message to all controllers in range, type “/your message here”
To copy the ASRC input line to the windows clipboard, type:
<CTRL-C>
To paste items from the windows clipboard to the ASRC input line, type:
<CTRL-V>
To save an entire chat history to a text file, make sure that the chat box is active, and type:
.log FILE <enter> (where FILE is a filename)
The history will be saved to the filename, and placed in the path indicated in the “logpath=” entry in the asrc.ini file. By default, this will be the ASRC directory. If you wish to change this, you may edit the “logpath=” entry in the asrc.ini file.
To copy an entire chat history to the windows clipboard, make sure that the chat box is active, and type:
.copy <enter>
The CRD
The CRD (Computer Readout Display) is the area to the lower right of the display. It is divided into three areas, the CRD, the RA (Response Area), and the MC (Message Composition).
The CRD portion may be toggled back and forth between two modes. One mode will display all transponder codes of aircraft that are being tracked, and of those that will be automatically tagged. And the other mode will display all altimeter settings being followed.
The RA is where responses to commands are displayed. This is where abbreviated flight plans, metars, and responses to almost every command are displayed.
The MC is where error messages are displayed.
Functions and dot commands
Most of the advanced functions in ASRC are implemented using standard function keys <F1> through <F9>. Each function key has a corresponding text command beginning with a “.” that is inserted into the input line when the function key is pressed. These text commands may be used in lieu of the function keys.
For example, to open or close the datatag for an aircraft the following two commands are equivalent:
<F1> {click on aircraft}
.QP {click on aircraft}
To quickly learn the text commands, watch the command that is inserted into the input line when you press a function key.
Inserting altimeter settings
To insert altimeter settings that are to be monitored, press F2, then the four digit ICAO code for up to 6 airports.
To remove an ICAO code, press F2, then the ICAO code to remove.
The altimeter settings will automatically update whenever they change.
Checking weather
To check weather for any facility, press:
<F7> ICAO (where ICAO is a four digit ICAO airport code)
The result will appear in the RA.
To check weather for the arrival airport of a given aircraft:
1. Radioselect the aircraft (CALLSIGN<asel>)
2. Press <F7><asel>
To check weather for the departure airport of a given aircraft:
1. Radioselect the aircraft (CALLSIGN<asel>)
2. Press <shift F7><asel>
Understanding datatags
This is perhaps the most important section of the user manual. Understanding datatags is fundamental to the successful use of ASRC.
As previously mentioned, ASRC has two main user modes:
1. DSR (Display System Replacement) mode, used in ARTCC’s (Centers)
2. ARTS-III mode, used in TRACON’s.
Two additional modes, Tower and Ground, are basically ARTS-III type modes. Tower and ground mode differ from ARTS-III mode in the following ways:
1. Tower mode datatags are always turned ON.
2. Ground mode datatags show CALLSIGN ONLY, and are always turned ON.
The datatags are entirely different in the two modes and will be discussed separately.
DSR mode datatags:
A. 
This is a primary target (the transponder is off, or on standby).
B. 
This is a target squawking 1200 (or other VFR code, see configuration).
The altitude of the target is displayed.
C. 
This is a “Mode C intruder”. It is a
target that falls within your altitude strata (altitudes turned on in your
filters), AND is not squawking 1200, AND is NOT OWNED BY ANYONE. The
target shows it’s transponder code, and its current altitude. If you wish to see more information about
this type of aircraft, press F1, and click the target.
D. 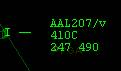
When you press F1 and click on the target, a full datablock will appear,
showing more information about the aircraft.
To close the datablock, press F1 and click the target again. In figure D, this aircraft is a voice enabled
aircraft (/v), level at it’s assigned cruise altitude of FL410 (410C), with a
computer ID of 247, and a groundspeed of 490 KTS.
E. 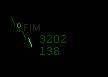
This is a target OWNED BY ANOTHER
CONTROLLER.
F. 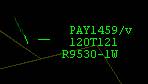
Again, if you press F1 and click on the target, a full datablock will appear,
showing more information about the aircraft.
To close the datablock, press F1 and click the target again. In this datablock we see that the aircraft is
a voice enabled aircraft (/v), assigned a temporary altitude of 12000 (120T),
currently at 12100 (121), with a computer ID of 953, owned by sector 1W
(R###O-1W)
G. 
This is a target NOT OWNED BY ANYONE,
AND ABOVE OR BELOW YOUR ALTITUDE STRATA.
H. 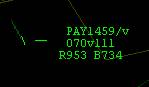
This is a target owned by someone else, assigned a cruise altitude of 7000
(070), descending out of 11100 (v111), with a computer ID of 953, and we see
that it is a Boeing 737. Note that the
lower right field toggles continuously between groundspeed,
destination/scratchpad, and aircraft type in all modes, except when owned by
someone else, the groundspeed is replaced by the ownership info.
I.
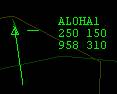
This is an aircraft OWNED BY YOURSELF
with no voice tag, assigned a cruise altitude of FL250, who is level at 15000,
has a computer ID of 958, and has a groundspeed of 310 KTS. Notice that the position indicator is a
backslash with a triangle over it. The
triangle indicates that he is more than 5 NM off course from his flight planned
route. He will become a diamond when he
is within 5 NM of his flight planned or amended route. Note that the distance line is user
configurable (see configuration).
J. 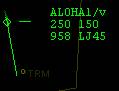
This is an aircraft within 5 NM of his flight planned or amended route. Notice the diamond shaped position indicator.
K. 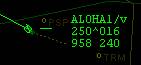
This is an aircraft assigned a cruise altitude of FL250, climbing out of 1600.
L. 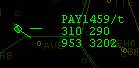
This is an aircraft assigned a transponder code, but on a different transponder
code. The transponder code that he is
currently on is displayed in the lower right field of the datablock
(3202). Once he changes his transponder
to the assigned code, it will revert to a normal datatag.
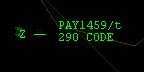
M. 
This is an aircraft on a DUPLICATE TRANSPONDER
CODE, a code that is also being squawked by another aircraft. If you see the word CODE, in the lower right field of the datablock, you know to
reassign a new transponder code to this aircraft.
N. 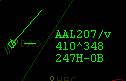
This is an aircraft assigned a final altitude of FL410, climbing out of FL348
who is in handoff mode from us to sector 0B (H-OB). When accepted the lower line will read
R247O-0B. See figure F. for an example
of someone already accepted by another facility.
O. 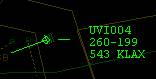
This aircraft was assigned a cruise altitude of FL260, was at that cruise
altitude of FL260, and descended 300 feet or more below that altitude without a
clearance without the controller having entering the descent into the
computer. Notice the (-) sign. If he were more than 300 feet above the assigned
altitude, and had already been at the assigned altitude, he would have a (+)
sign between the two altitudes.
P. 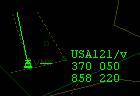
This aircraft is identing. Notice the
three bars over the position indicator.
Q. 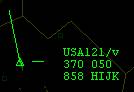
This aircraft is squawking 7500.
R. 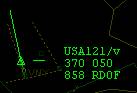
This aircraft is squawking 7600.
S. 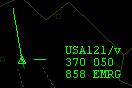
This aircraft is squawking 7700. The
whole datatag will flash.
T. 
This aircraft is in COAST mode. It has either lagged off the system, been
disconnected, or the user has intentionally disconnected. The aircraft will continue to “coast” along
on the last known heading and at the last known speed. This is not real data, and it is only an
assumption. Do not rely on the position
to be accurate. The aircraft may have
turned, or changed speed since he was lost from radar. When the aircraft returns, the coasting icon
will change to a real datatag. To
destroy a coasting target, press F4 and click on the aircraft to “drop track”
(see below).
ARTS mode datatags:
A. 
This is a primary target (the transponder is off, or on standby).
B. 
This is a target squawking 1200. It
shows altitude and groundspeed.
C. 
This is a target that is not squawking
1200, AND is NOT OWNED BY ANYONE.
Again it shows altitude and groundspeed.
If you press F1 and click on the target, it will display more
information about the aircraft.
D. 
This is a target owned by another sector, sector W. In ARTS mode, active sectors have two digit
identifiers on the controller list, but only one letter shows up as the
position indicator on the datatag. This
is user configurable in the POF (see configuration).
E. 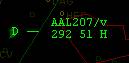
Assuming that you, yourself, are ARTS tag D, this is an aircraft OWNED BY YOURSELF. In this example the aircraft is voice
enabled, at FL292, has a groundspeed of 510 KTS and is a heavy.
F. 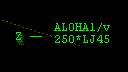
ARTS datatags alternate data on the second line. At first, it may be confusing. When the asterisk is present, the information
being viewed is supplementary information.
Learn to read current altitude and groundspeed when the asterisk is
absent. In this example the asterisk is
present, and we see that the last assigned altitude was FL250, and that the
aircraft is a LJ45.
G. 
The second line of the ARTS datatag alternates through several different
informational modes, always returning to ALT GS in between each of the other
informational modes. When in
informational mode, the left field alternates between DESTINATION or
SCRATCHPAD, and CURRENT ASSIGNED ALTITUDE.
The right field is always the aircraft type.
H. 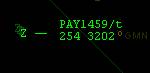
This is an aircraft assigned a transponder code, but on a different transponder
code. The transponder code that he is
currently on is displayed in place of the groundspeed (3202). Once he changes his transponder to the
assigned code, it will revert to a normal datatag.
I.
This is an aircraft on a DUPLICATE
TRANSPONDER CODE, a code that is also being squawked by another
aircraft. If you see the word CODE, in place of the groundspeed, you
know to reassign a new transponder code to this aircraft.
J. 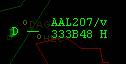
This aircraft is being handed of to the sector represented in the POF by the
letter “B”. Notice the “B” between the
altitude and the groundspeed. Once
accepted the “D” indicating that YOU own the aircraft will turn to a “B” and
the second line of the datatag will no longer display the “B” between altitude
and groundspeed.
K. 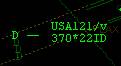
This aircraft is identing.
L. 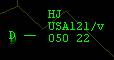
This aircraft is squawking 7500.
M. 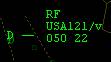
This aircraft is squawking 7600.
N. 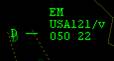
This aircraft is squawking 7700.
O. 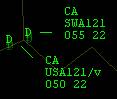
These two aircraft are in conflict alert status (see configuration to customize CA/CA thresholds).
P. ![]()
This aircraft is in COAST mode. It has either lagged off the system, been
disconnected, or the user has intentionally disconnected. The aircraft will continue to “coast” along
on the last known heading and at the last known speed. This is not real data, and it is only an
assumption. Do not rely on the position
to be accurate. The aircraft may have
turned, or changed speed since he was lost from radar. When the aircraft returns, the coasting icon
will change to a real datatag. To
destroy a coasting target, press F4 and click on the aircraft to “drop track”
(see below).
To move the position of a datatag, type:
<F1> P ACFT (where “P” is a key on the numpad representing the desired direction of the leader)
To change the direction and length of the datatag leader, type:
<F1> P/L ACFT (where “P” is a key on the numpad representing the desired direction of the leader, and “L” is the length 1-9)
To change just the length of the datatag leader, type:
<F1> /L ACFT (where “L” is the length 1-9)
Selecting and performing functions on aircraft
There are many ways to perform functions on aircraft. Depending on the situation, you may:
1. Radioselect
2. Use a list letter
3. Click (slew) on the target
4. Use the CID (computer ID)
5. Use the Callsign
Radioselect
To “radioselect” an aircraft, type any unique portion of the callsign, and press the AIRCRAFT select key (hereafter called the <asel> key, see configuration). If a successful match was found, the aircraft ID will be displayed immediately above the text input area. If no such unique match exists, you will hear an audible alert (if enabled, see configuration), and the area immediately above the text input area will be blank.
You may radioselect ANY AIRCRAFT, whether owned, unowned, visible, or invisible.
Once an aircraft is radioselected, if you wish to perform a function on that aircraft, you may press a function key, or use a key sequence, and then press the <asel> again, to have that function be executed on the currently radioselected aircraft.
List Letter
When a request, hold, departure, arrival, or coast list is displayed, each aircraft in the list has a unique letter preceding its callsign. In lieu of typing a portion of the callsign followed by the <asel>, you may press the single letter next to the aircraft in the list, followed by the <asel>. This will radioselect that aircraft.
Click (slew) on the target
For many functions, you may press the function key, or enter the keyboard equivalent, and then click (slew) on the target.
Use the CID
The most common way to perform functions on aircraft when busy and in DSR mode is by using the CID. This is the number displayed in the lower left field of the datablock. To perform a function using the CID, press the function key, or enter the keyboard equivalent, enter any required values, and then enter the CID followed by the <enter> key.
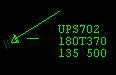
Example: To change the temporary altitude of UPS702 to
FL180

Press <F8> 180 135 <enter>, and you’ll see:
Use the callsign
To perform a function using the callsign, press the function key, or enter the keyboard equivalent, enter any required values, and then enter the callsign followed by the <enter> key
In the following sections the term “ACFT” shall mean selecting an
aircraft with any of the previous selection methods.
In most cases ANY of the selection methods will work.
For example, if your <asel> key is the default “+” key, any of the following will handoff an aircraft whose callsign is N12345 and whose CID is 876 to sector 1W:
· <F4> 1w 876<enter>
· <F4> 1w {mouse click on aircraft}
·
N12345+
<F4> 1w+
· <F4> 1w N12345<enter>
In DSR mode, the most common and most useful way to perform functions will be by CID.
Syntax:
<function key> value CID
Example:
The following example sets the assigned cruise altitude (see below) of the aircraft whose CID is 943 to FL240…
<F5> 240 943
In ARTS mode, the most common and most useful way to perform functions will be by RADIOSELECTING.
Syntax:
CALLSIGN <asel> <function key> value <asel>
Example:
The following example sets the voice/text tag to voice…
N12345 <asel> <F9> v <asel>
Transponder codes
ASRC allows controllers to assign unique transponder codes. The CODE key is <F9>.
To have ASRC automatically assign a transponder code to an aircraft (from an available pool of transponder codes specified in the POF file):
1. Radioselect the aircraft using <asel>
2. Press <F9> <asel>
To manually assign a transponder code to an aircraft, press:
<F9> CODE ACFT
(where CODE is any four digit transponder code, and ACFT is any aircraft selection method.)
When you assign a code to an aircraft, that code is always placed into your “code list”. The “code list” may be viewed by toggling between METR and CODE in the CRD. The code list displays all transponder codes that are being followed by you. Any aircraft on a code that is in your code list will automatically become tagged up once airborne.
All “tracked” aircraft will automatically have their code placed into your code list.
To remove a code from the code list (does not work on tracked aircraft), type:
<F9> CODE <enter>
Wrong, and duplicate transponder codes are flagged to the controller in the datatag (see Understanding Datatags), and in the RA when the abbreviated flight plan is viewed.
Tagging
To “tag up” an aircraft (make him go from a limited datablock to a full datablock), use the <F1> key with any selection method above. To go to a minimal datatag use the <F1> key again. You may not go to a minimal datatag on aircraft that you own.
Tracking
Tracking is the heart of ASRC, and is the most common function (next to dropping track) that you will use. Aircraft in ASRC are “tracked” (owned) by one and only one controller. Each ASRC client knows who owns whom. You will always know if, and by whom, an aircraft is being handled. In order to perform a handoff you must be the owner of the aircraft. In order to change certain aircraft parameters, including cruise, and temporary altitudes, scratchpad values, etc. you must be tracking the aircraft. Controllers cannot change these values an aircraft is being tracked by someone else.
To track an aircraft, type:
<F3> ACFT
To drop track on an aircraft, type:
<F4> ACFT
Since legacy clients cannot “drop track”, when a legacy controller client has accepted a handoff from an ASRC client, the aircraft will appear to be owned by the controller using the legacy client until either the legacy client hands off to an ASRC client, or until the pilot disconnects. If the aircraft lands and then departs into another controller’s airspace, he may appear to be owned by the previous legacy client controller. In such a case it may be necessary to “forcefully” drop track.
To force drop track on an aircraft, type:
<F4> /OK ACFT
When you hand an aircraft off to another controller, and the handoff is accepted, you automatically drop track on that aircraft.
When you accept a handoff from another facility, you do so by tracking the target (pressing <F3> with any selection method above)
Viewing flight routes
You can view the route of any aircraft with a valid flight plan by using <SHIFT F6> with any selection method above.
Assigning cruise altitude
When an aircraft’s cruise altitude is changed, all changes are propagated to other controllers, and the flight plan is automatically amended, and sent to the server.
To assign a cruise altitude to an aircraft, type:
<F5> ALT ACFT <enter> (where ALT is up to three numerical digits indicating hundreds of feet)
To assign a block cruising altitude to an aircraft, type:
<F5> ALTBALT <enter> (where the first ALT is the block floor and the second ALT is the block ceiling)
To take an IFR aircraft and make it a VFR aircraft, type:
<F5> VFR ACFT
To take a VFR aircraft and make it an IFR aircraft, type:
<F5> ALT ACFT (where ALT is the assigned cruise altitude)
Assigning temporary altitude
When an aircraft’s temporary altitude is changed, all changes are propagated to other controllers within visibility range.
To assign a cruise altitude to an aircraft, type:
<F8> ALT ACFT <enter> (where ALT is up to three numerical digits indicating hundreds of feet)
Using the scratch pad
By default, the “scratch pad” shows the destination of the aircraft. It is displayed in both DSR and ARTS modes. You may change from the default value to any three character alphanumeric string.
To insert a scratch pad entry, type:
<INS> ABC ACFT <enter> (where ‘ABC’ is up to three alphanumeric characters)
To clear the scratch pad, and display the destination airport in the scratchpad, perform the same function, but without a string:
<INS> ACFT
If the aircraft is being tracked by another controller, and you need to update the scratch pad, you may do so by typing:
<INS> /OK ABC <enter> (where ‘ABC’ is up to three alphanumeric characters)
When an aircraft’s scratch pad value is changed, all changes are propagated to other controllers within visibility range
Voice/text/receive flags
ASRC will look at the pilots flight plan. If it finds certain elements in the comment section, it will appropriately place a flag in the datatag to indicate its voice/text/receive status.
If ASRC finds :
/v/ in the comment section, it automatically set the datatag to callsign/v indicating that the pilot uses voice
/t/ in the comment section, it
automatically set the datatag to callsign/t indicating that the pilot uses text
/r/ in the comment section, it automatically set the datatag to callsign/r
indicating that the pilot can only receive voice
If there is no tag in the comment section the controller may manually enter the voice/text/receive flag.
The syntax is:
<F9> C ACFT <enter> (where ‘C’ is either ‘v’, ‘t’, or ‘r’)
When an aircraft’s voice/text/receive flag is changed, all changes are propagated to other controllers within visibility range
Accepting handoffs
To accept a handoff, simply TRACK the aircraft by using the <F3> key with any of the selection methods above.
Initiating handoffs
To initiate a handoff, you basically DROP TRACK to another controller using the <F4> key with any of the selection methods above.
The syntax is:
<F4> CC ACFT (where CC is the two digit identifier next to the controller in the controller list)
Examples:
<F4> CC CID <enter> (where CID is the aircraft’s computer ID)
<F4> CC {mouse click on aircraft}
CALLSIGN<asel>
<F4>CC<asel>
<F4> CC CALLSIGN<enter>
To handoff ALL AIRCRAFT OWNED BY YOU to controller dd, type:
.transfer /ok CC
Canceling handoffs
To cancel a handoff once it has been initiated, but not yet accepted:
TRACK the aircraft by using the F3 key with any of the selection methods above.
If the receiving controller is using ASRC, this will stop the handoff indication on the receiving controller’s scope. If the receiving controller is using a legacy radar client, it may continue indicating a handoff request.
Refusing handoffs
To refuse a handoff from another sector:
DROP TRACK on the aircraft by using the F4 key with any of the selection methods above.
If the initiating controller is using ASRC, this will stop the handoff indication on the initiating controller’s scope. If the initiating controller is using a legacy radar client, it may continue indicating a handoff request.
Pointouts
To cause a target to appear on any other controller’s scope, to assist in pointout use the F1 key followed by that controller’s identifier.
The syntax is:
<F1> CC ACFT <enter> (where CC is the two digit identifier next to the controller in the controller list)
You will still need to communicate the pointout information via text or voice.
If the receiving controller is using a legacy radar client, this function has no effect.
Flight plans
An abbreviated flight plan (only that portion with fixes that are in your sector file) may be viewed in the RA by either left clicking on the aircraft’s datatag, or by radioselecting the aircraft.
To view the complete flight strip, use the <F6> key with any selection method above.

To close the flight strip, click on it, or use the <F6> key, followed by the <enter> key.
Flight plan amendments
Flight plan amendments in ASRC are propagated through the server and to all other radar clients, including legacy programs.
There are several types of flight plan amendments available. You may change the requested altitude, assigned cruise altitude, true airspeed, route, beacon code.
If you do not have a flight strip visible, you must select the aircraft using any of the above methods.
Otherwise, if you open, and have a flight strip displayed, the syntax is:
.am typ TYP <enter> (where TYP is the four character aircraft type)
.am ral ALT <enter> (where ALT is up to three digits representing altitude in hundreds of feet)
.am alt ALT <enter> (where ALT is up to three digits representing altitude in hundreds of feet)
.am spd SPD <enter> (where SPD is up to three digits representing true airspeed in KTS)
.am bcn BCN <enter> (where BCN is a four digit transponder code)
.am rmk RMK <enter> (where RMK is as follows this.is.my.remark.separated.by.a.mandatory.punctuation.of.any.kind.except.for.white.space)
The next function is the most useful, but the most complex.
Using the following flight strip as an example:
.am rte abi.sso (removes J4 from the route)
.am rte kdfw.ksea (removes the entire route except for the departure and arrival airports)
.am rte abi.fix1.fix2.sso (inserts fix1.fix2 between ABI and SSO)
.am rte @ksfo (changes the departure airport. You may use the up arrow in lieu of the @ symbol)
.am rte ksea@ (changes the arrival airport. You may use the down arrow in lieu of the @ symbol)
To take an IFR aircraft and make it a VFR aircraft, type:
<F5> VFR ACFT
To take a VFR aircraft and make it an IFR aircraft, type:
<F5> ALT ACFT (where ALT is the three digit assigned cruise altitude in hundreds of feet)
When an aircraft’s flight plan is amended, all changes are propagated through the server to all other controllers, even those using legacy controller clients.
Flight plan creation
ASRC allows creation of complete VFR or IFR flight plans.
CAUTION: Creating a new
flight plan for an aircraft will COMPLETELY AND IRREVOCABLY DELETE the
existing flight plan.
To create an IFR flight plan for an aircraft, radioselect the aircraft, and type:
.fp TYP ALT RTE <asel>
where:
TYP = four digit aircraft type
ALT = cruise altitude
RTE = complete route starting with origin, ending with destination, and separated by <periods> with no spaces.
Example:
.fp B737 130 klax.laxx3.trm.psp
To create a VFR flight plan (for example, an AC requesting VFR flight following), radioselect the aircraft, and type:
.vp TYP RTE <asel>
Example:
.vp C812 ktoa.shoreline.kvny
RSB (Range/Speed/Bearing)
The RSB function allows quick calculation of range, speed and bearing. There are several methods for using it.
Method 1:
1. Double click anywhere on the scope, and hold down the left mouse button.
2. Drag to any other location.
3. Release.
4. Read the values in the RA.
Method 2:
1. Type .rsb FIX ACFT (where FIX is any ICAO airport, VOR, NDB or fix)
2. Read the values in the RA.
Method 3:
1. Type .rsb FIX1 FIX2 (where FIX1 and FIX2 are any two ICAO airports, VOR’s, NDB’s, or fixes)
2. Read the values in the RA.
The RA will display:
H: 279 099 (heading to and from the two points)
D: 74.7 (distance between two points)
T: 11 (the time to destination, if method # 2 is used)
Centering, panning, and zooming
To center the scope anywhere:
{double right click}
To pan the scope:
{right click and drag}
To center on any airport, fix, VOR or NDB, type:
FIX <HOME> (where FIX is any ICAO airport, VOR, NDB or fix)
To zoom in:
press <F11>
or {mouse wheel up}
To zoom out:
press <F12>
or {mouse wheel down}
Individual fixes
To turn on and off individual fixes, type:
.ff FIX [FIX FIX …] <enter>
Filters and Quick Look
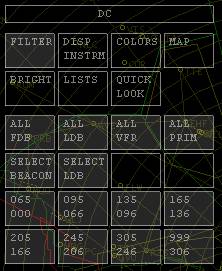
The filters section was discussed in the configuration section. The QUICK LOOK button disables all filters, and reveals every aircraft. This is useful if you have set filters and wish to see an aircraft that may be outside of your visible altitude strata.
Request list
When very busy, sometimes it is useful to have a list of aircraft that have requested something. For this purpose, ASRC uses a REQUEST LIST. This list is displayed automatically whenever entries are added. If REQUEST LIST entries exist, the REQUEST LIST may be toggled off and on using the LIST buttons described in the configuration section.
To add an aircraft to the request list, type:
CALLSIGN <asel> <asel>
To remove an aircraft from the request list, again type:
CALLSIGN <asel> <asel>
In the request list, the first column is the aircraft list letter, followed by the callsign, then an “R” for REQUEST, then the departure and arrival airports, then the number of minutes and seconds since having been placed in the queue.
An alternate method for adding or removing aircraft from your request list is to type the following:
.ql r ACFT
If an aircraft has signed off from the network, it is impossible to radioselect him. To remove the aircraft, type:
.ql r CALL <enter> (where CALL is the full callsign)
Hold list
The HOLD LIST contains a list of all aircraft assigned a holding pattern. This list is displayed automatically whenever entries are added. If HOLD LIST entries exist, the HOLD LIST may be toggled off and on using the LIST buttons described in the configuration section.
To add aircraft to this list type:
.ql h FIX MINS ACFT (where FIX is the fix over which the aircraft will hold, and MINS is the number of minutes from now to expect further clearance)
In the hold list, the first column is the aircraft list letter, followed by the callsign, then an “H” for HOLDING, then the fix, then the last assigned altitude, then the expect further clearance time.
To remove an aircraft from the list, type:
.ql h ACFT
Departure list
The DEPARTURE LIST shows aircraft outbound from any number of user-specified airports. This list is displayed automatically whenever entries are added or auto-generated based upon user settings. If DEPARTURE LIST entries exist, the departure list may be toggled off and on using the LIST buttons described above.
The format for the departure list is:
LETTER AIRCRAFT D ARR-DEST SQUAWK
LETTER is the single alphabetical letter representing that aircraft in the list. This is used to quickly pull up information about that aircraft.
AIRCRAFT is the full aircraft callsign
D is the single letter D to let us know that this is a DEPARTURE
ARR is the four digit DEPARTURE airport ID
DEST is the four digit ARRIVAL airport ID
SQUAWK is the squawk code
For example:
A N12345 D KLAX-KSAN 7201
B SWA998 D KLAX-KLAS 7202
To add or remove airports that you will be monitoring:
1. On the OPTIONS menu, click SETTINGS
2. Enter the four letter airport designator that you wish to monitor in the box above DEPARTURES/ARRIVALS
3. Click ADD or REMOVE
4. Click OK to close the Settings box
To manually add or remove someone to your departure list, type:
.ql a CALLSIGN <enter>
To manually push someone to the departure list of another controller, type:
.ql d CC <enter> (where CC is the two digit controller ID from the controller list)
Arrival list
ARRIVAL LISTS show aircraft inbound to any number of user-specified airports. This list is displayed automatically whenever entries are added or auto-generated based upon user settings. If ARRIVAL LIST entries exist, the ARRIVAL LIST may be toggled off and on using the LIST buttons described above.
The format for the arrival list is:
LETTER AIRCRAFT A APT DIST
LETTER is the single alphabetical letter representing that aircraft in the list. This is used to quickly pull up information about that aircraft.
AIRCRAFT is the full aircraft callsign
A is the single letter A to let us know that this is an ARRIVAL
APT is the four digit airport ID
DIST is the distance in miles from the arrival airport
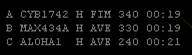
For example:
A N12345 A KLAX 153
B SWA998 A KLAX 50
To add or remove airports that you will be monitoring:
1. On the OPTIONS menu, click SETTINGS
2. Enter the four letter airport designator that you wish to monitor in the box above DEPARTURES/ARRIVALS
3. Click ADD or REMOVE
4. Click OK to close the Settings box
To manually add or remove someone to your arrival list, type:
.ql a CALLSIGN <enter>
Traffic alerts
To quickly issue traffic advisories to text aircraft, radioselect the aircraft to whom you would like to issue advisories, and type:
.ta {click} (where click means clicking on the target traffic)
Be sure to insert a space after the .ta command
Non-responsive aircraft
ASRC has an internal function which causes it to send a private message to an aircraft similar to:
N12345, contact me on 124.5
To use this function, type:
<HOME> {click on the aircraft}
If successful, you will see a message in the RA that says “msg sent”
Request position relief
To request a position relief (break), type:
.break
To cancel a position relief request, type:
.nobreak
When you have requested position relief, your callsign (above the clock) will turn pink.
Send a message to all of your tracked aircraft
To send a message to all of your tracked aircraft, type:
.pan MESSAGE <enter> (where MESSAGE
is any text message with or without white space)
Send a message to all Supervisors online:
To send a message to all Supervisors online, type:
.wallop MESSAGE <enter> (where MESSAGE is any text message with or without white space)